 Back to Exterior Painting How-To's
How to Paint the House Body
Painting the body of your home may seem daunting, but a little patience and a vision of the finished project will spur you on to completion.
For Best Results:
Remember that the technique for painting the body of your home varies slightly depending on the surface type. Make sure to review the how-to steps specific to your surface: either masonry/stucco or siding.
Do not apply excessive pressure to a surface to try to squeeze more paint out of your brush or roller. Reload with paint as necessary and let the tools do the work.
Suggested Tools & Supplies
- Brush 5.1 - 6.4 cm (2"-2½")
- Bucket
- Bucket Grid
- Extension Pole
- Nylon Gloves
- Ladder
- Paint Can Opener
- Paint Tray
- Paint Tray Liner
- Roller Cover and Frame
- Rags
- Drop Cloths
- Roller Frame
- Stir Stick
Masonry or Stucco
-
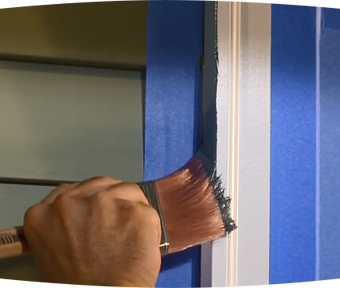
Step 1
Start at the top corner of the project area, and cut in a three- to four-inch wide area around the perimeter with a brush.
TIP: Smooth out the cut-in area by lightly brushing the tip of the bristles over the newly painted area, to create a feathered edge.
-
Step 2
Working in a three-by-three area, apply a "W"-shaped pattern toward the top of your wall, or the section to be painted.
TIP: The "W" should not be any wider than one arm-length, which is typically twenty-four to thirty-two inches.
-
Step 3
Start filling in the width of the "W" pattern, from top to bottom, and continue until the area is completely covered.
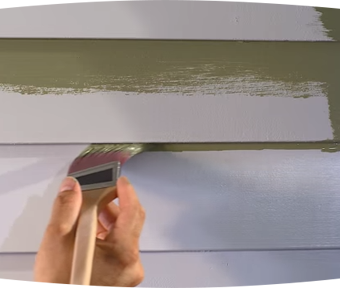
Siding
-
Step 1
Start in the top corner of the project. Cut in a three- to four-inch wide area around the perimeter with a brush, including any grooved or lapped areas.
TIP: Smooth out the cut-in area by lightly brushing the tip of the bristles over the newly painted area, to create a feathered edge.
-
Step 2
Then, place a loaded roller near one corner of your project, approximately three to four inches from where you cut in. Roll side-to-side, or top-to-bottom, following the direction of the siding, until complete.
TIP: If you need to stop or break during your paint job, stop at a natural break in the siding, such as a corner or where the siding meets the window frame.
Ensure Color Consistency
-
Step 1
When you are nearing the end of one container of paint, find a natural break in your project, such as a corner or the end of a section of trim.
-
Step 2
Open a second container and mix it into the paint from the first container. Stir well.
Drips and Spills
-
Step 1
If you have a drip on a painted surface that's still wet, you can feather it out using your brush, or gently roll over the drip with your roller.
-
Step 2
If drips are dried, you may have to scrape the drip off and touch up the spot with fresh paint. Do not pull the drip. Instead, scrape and sand the area.
TIP: Avoid leaving hard lines for touch-ups by feathering out the edges with a brush.
More How-Tos

ADDITIONAL RESOURCES

PAINT AND STAIN CALCULATOR
Inside or outside; paint or stain: Let’s figure out how much you’ll need to make amazing happen.
Calculate
ASK AN EXPERT
Every project is unique: Keep small wrinkles from becoming big problems by letting the Behr Technical Experts lend a hand.
Get Expert Help
COLOUR STUDIO
So many colours and so many ideas: Visit Behr’s Colour Studio for inspiration, colour tools, design advice and everything you need to find your project’s perfect colour.
Colour Studio


